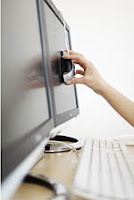
There are lots of challenges in digital photography and one of the most common is getting good prints of our favorite shots from our home printer. There are a number of steps you can take to improve your results. The first one is to adjust your screen so that it displays brightness and color accurately. This is called calibrating your monitor and is best accomplished using a tool specifically for that job.
For simple monitor calibration, I recommend the Spyder3 Express by Datacolor. (Available from B&H Photo.) It costs about $80, works on both Mac and Windows computers, and calibrates both desktop and laptop screens. To use it, you install the software and then attach the Spyder itself via USB cord. The software gives you easy to follow directions and in less than 15 minutes your monitor has been adjusted to display color and brightness appropriate for digital photographs. (Calibrating your monitor will not hurt any other programs on your system.) You will need to recalibrate your monitor about once a month because the display will slowly change over time. You can set the Spyder software to remind you when it's time to recalibrate.
A few of you (especially people with Apple monitors) might be thinking you can use Apple's Calibration Assistant (part of the Display System Preference) or maybe Adobe Gamma (a free application that comes with some Adobe products and is installed under the Control Panel on Windows) to adjust your monitor. After all they are free! I do not recommend you use these programs to adjust your monitor. Both of these tools rely on your vision to adjust your monitor to the proper brightness and color. However, our eyes are not a reliable judge of these qualities. Spend the money for a basic calibration tool and you will get much better results.
Sometimes, however, this calibration process isn't enough to get your prints to come out looking like the monitor. Recently a friend of mine had this problem. He had gotten a new monitor and a new inkjet printer. He had calibrated his screen and was following all the proper steps to print his pictures, but they were coming out nothing like the monitor. This was puzzling! So I took a look at the screen settings directly by using the menus on the monitor itself.
All LCD monitors are delivered with the screen set to be very bright and to display extremely vivid colors. This is fine for surfing the web or writing letters and emails. But it does not make a good match to a photo printer. Images on paper will always look less colorful and less bright than how they appear on screen. So we have to adjust our monitors to be closer to the ink on paper version to accurately preview our printed pictures.
 If you have calibrated your monitor and still are not getting a good match, you may need to change the monitor settings directly. Under my friend's monitor menu was a choice for "display color" or "preset modes". (Your monitor's menu choices may be different.) It was set to Standard and this was not working well. But there was a choice for "sRGB", which is an abbreviation for "standard Red Green Blue". This setting is a nearly universal one for digital photography. So I changed the monitor setting from "standard" to "sRGB" and recalibrated the screen. On the next print...Success!
Special note to people with Apple monitors: you do not have the same monitor menu that I talk about in this article. So your monitor should calibrate just fine without having to make a change to "sRGB".
Even if you upload your pictures to Kodak or another online photo lab instead of printing them yourself, calibrating your monitor will help you get good results from the lab as well. Lack of monitor calibration is the number one reason people are unhappy with their lab prints, too.
So to help you get a better match of your photos to your prints, set your monitor menu display to "sRGB" and then calibrate your screen using a calibration tools such as the Spyder 3 Express by Datacolor.
If you would like to learn more about printing your pictures and getting great results, check out my Basic Printing with Lightroom workshop at the Rocky Mountain School of Photography.
Note: I do not receive any compensation from Datacolor. I have been happy with their monitor calibration tools for many years and use them myself.
